Hello everybody, hope you are having an incredible day today. Today, we’re going to prepare a special dish, chocolate illusion cake. One of my favorites. This time, I will make it a little bit unique. This will be really delicious.
So Yummy Chocolate Cake Decorating Tutorials 😍 Best Satisfying Cake Decorating Recipes 💓 So Tasty. Tutorial on how to decorate a wedding cake with an optical illusion pattern using white and dark modeling chocolate. See more ideas about cake tutorial, cake, modeling chocolate. An illusion cake is a cake that looks 'anything but a cake,' as the Bake Off judges put it.
Chocolate Illusion Cake is one of the most well liked of current trending meals on earth. It’s simple, it’s fast, it tastes delicious. It’s appreciated by millions every day. They’re fine and they look wonderful. Chocolate Illusion Cake is something that I’ve loved my whole life.
To begin with this recipe, we have to first prepare a few components. You can have chocolate illusion cake using 4 ingredients and 11 steps. Here is how you cook it.
The ingredients needed to make Chocolate Illusion Cake:
- Take Dark Sponge
- Take Light Sponge
- Take Chocolate Spread
- Prepare Chocolate Decorations of your choice
Indulge in these irrestible chocolate cake recipes. From classic chocolate fudge cake to gooey chocolate torte, find your new favourite. See more ideas about modeling chocolate, cake decorating, chocolate. This tutorial demonstrates how to make an optical illusion cake using three different tones of rolled modeling chocolate.
Instructions to make Chocolate Illusion Cake:
- Repeat this with both sponges
- Using a long sharp knife, carefully slice the sponge into 3 equal slices
- Look around your kitchen for 2-3 round items to use as a cutting guide. I’ve simply used a saucepan lid and 2 different sized cutters.
- Lay your first slice on a chopping board and using your biggest disc, cut around the layer using a sharp vegetable knife. Then repeat with your smaller shapes. Do this to both a dark and light slice.
- Now remove the outer ring of both slices and swap them and repeat with the other rings. (This is where pictures are helpful.
- Once you’ve cut and swapped alternate rings on both slices, it’s time to start building. Spread a layer of chocolate spread over the first layer, then pick up the other complete set of rings and lay it on top.
- Repeat the above process with the other 4 slices but on the final layer, do not put anything on the top just yet.
- You will have quite a huge cake but we want it to bond. To do this place the cake tin ring around the cake and fasten, cover with cling film then weight the top. I used a baking tray and a saucepan of cold water. This process will adhere the layers fully. I left mine overnight but 2 hours will be long enough.
- Now decorate at will. I simply used Chocolate Spread and melted chocolate.
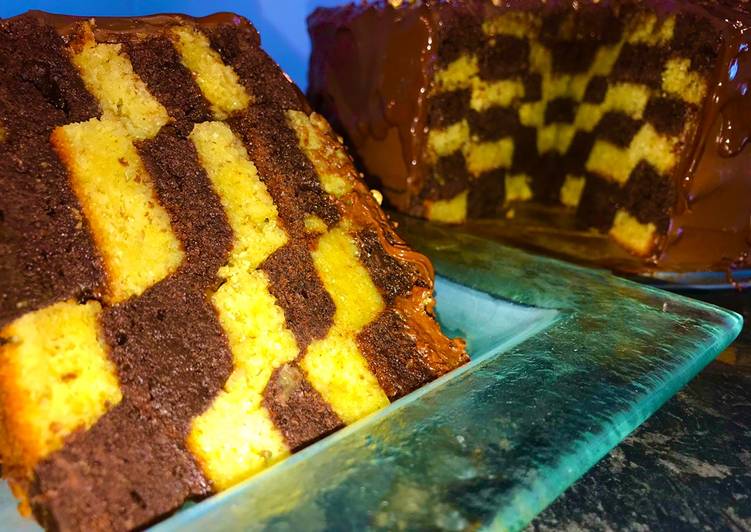
- At this stage your guests will just think it’s a normal chocolate cake, until it’s cut. Then watch their faces.
- No matter where the cake is cut, you will end up with a mind boggling slice of squares from a round cake. Keep the secret, it’s just a hack. As ever, enjoy.
See more ideas about modeling chocolate, cake decorating, chocolate. This tutorial demonstrates how to make an optical illusion cake using three different tones of rolled modeling chocolate. Everyday I show you the most satisfying video in the world about cake decorating, cake tutorials compilation. It's so amazing cake decorating tutorials videos that make you want to eat. The chocolate art can't go on the wall because we. live in Australia and it will melt.
So that is going to wrap this up for this special food chocolate illusion cake recipe. Thank you very much for your time. I’m sure that you will make this at home. There’s gonna be more interesting food in home recipes coming up. Remember to save this page on your browser, and share it to your loved ones, colleague and friends. Thanks again for reading. Go on get cooking!